Making an 808 Instrument using Kontakt 5
In this tutorial you will learn how to import 808 samples into Kontakt 5 and make 808s for trap music, and hip hop..
Why use a Sampler??
There are numerous benefits of playing 808 sounds with a sampler rather than a synth. As each note is played the audio file, (or sample) is triggered instead of a waveform. As a result the sample being played sounds better than a waveform. Most samplers have a lot better built in effects and processors than a typical software synthesizer, which allows for more flexibility when creating sounds. Samples can be further sculpted to fit your needs.
In this Tutorial we will be making an 808 Instrument using Kontakt 5. Abelton Live, and Adobe Audition also will be used in this lesson to edit the samples.
Create the 808 Samples
Load up one of your favorite 808 Synth Presets, if your are not sure how to make your own, visit one of our previous posts on 808 production tips.
Make the MIDI file.
Make/Draw a Midi file with notes C1 to C3 as shown in the example below. You want each note to be as long as possible, (long Decay) and make each note same length. You can download the MID file from the example “HERE”
Midi notes of C1 to C3.

808 C1 Audio example.
Record enable a new track and record the Midi (C1 to C3) to a new track that will be edited later.
Once the audio has been recorded click the “edit” button to open the file in your editor of choice. In this example we will be using Adobe Audition to chop up the 808 samples.
Notes C1 to C3 recorded.


*If you do not have your own Audio editor, Download the Content for this tutorial here..
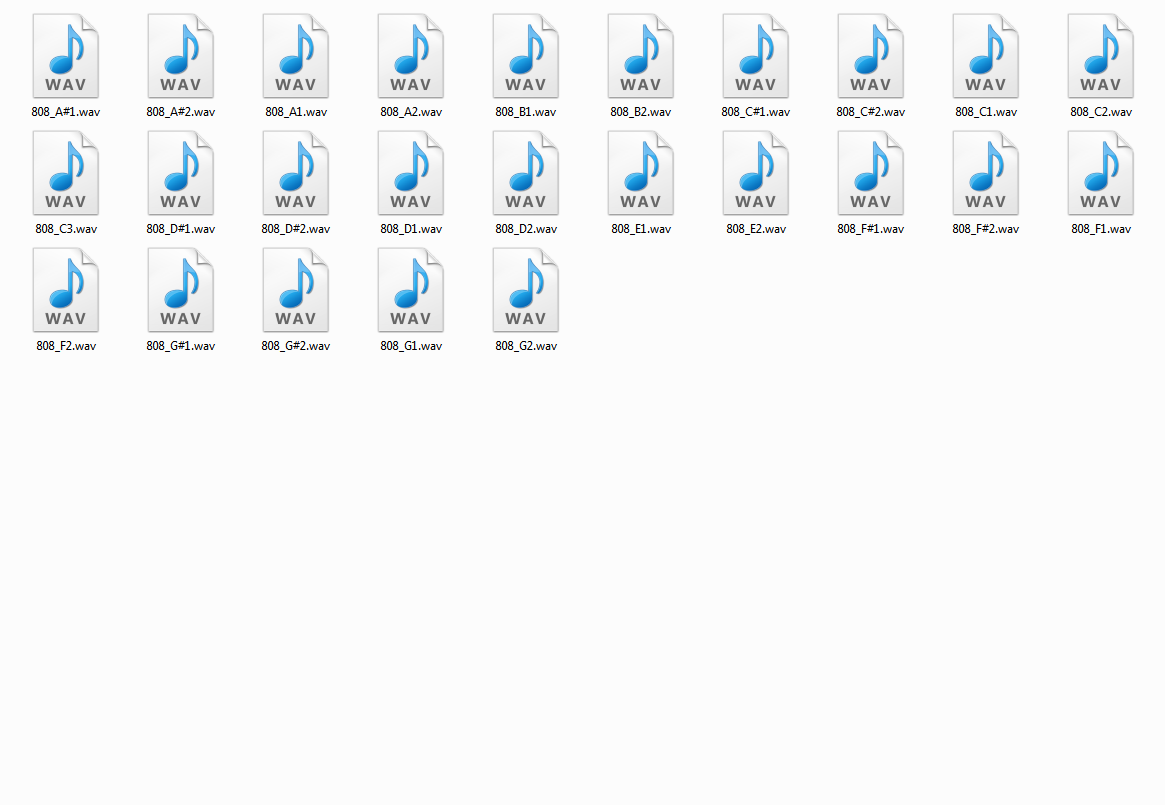
The most important thing when editing the files is to save each file strictly to a naming convention. In this example we will save each file as 808_”X”, with X being the note value. Naming the samples this way allows the samples to be imported into Kontakt 5 easier as you will soon see. All of these files will be saved to a folder.
Once audition has loaded we will be able to save each note as a separate file. Which is easy done in Adobe Audition. Drag the mouse over each sample and press “CTRL + ATL + S” This will save the selection as a new file. Remember to stick to the naming convention.
808 sample selected in Adobe Audition.

Saving the selected sample. And naming the sample.

Once saved press “CTRL + X” to delete the selection.. Do this for all of the samples from C1 to C3.
Once you are done you should have 25 individual samples. Notes C1 to C3
ADDING 808 SAMPLES TO KONTAKT VIA AUTO MAP
Load up Kontakt and crate a new instrument

Select all of your samples from the folder and drag them to Kontakt. At this point they will not be in order by notes. But if you named them properly the samples can be auto-mapped.
Click on the wrench icon in the upper left and select the “mapping” tab

Drag Samples to ‘Mapping” section in Kontakt

Auto Mapping samples
With all the samples selected right click and chose “Auto Map Setup”

If you named your samples properly you should be able to ignore the 808, and set the note values to a single key. Click Apply and the samples will be mapped to each note.

ADJUSTING SAMPLES ACROSS KEYBOARD
Notes C1 and C3 can be extended as low or as high as you like.

ADJUST VOICING TO ONE NOTE AT A TIME
Because there is no reason to play chords, or more than one note at a time with 808s, we need to adjust the voicing to 1. See screenshot below and set voicing to 1.

ADSR
Adjust the ADSR to taste, we prefer to turn the Sustain down and use the decay to make the kick longer and shorter.
Kontakt 808 Decay example
PITCH Modulation
Changing the 808s Pitch in Kontakt is done similar as in other synths.
Drag and drop an ADSR envelope to the tune knob and adjust to taste.
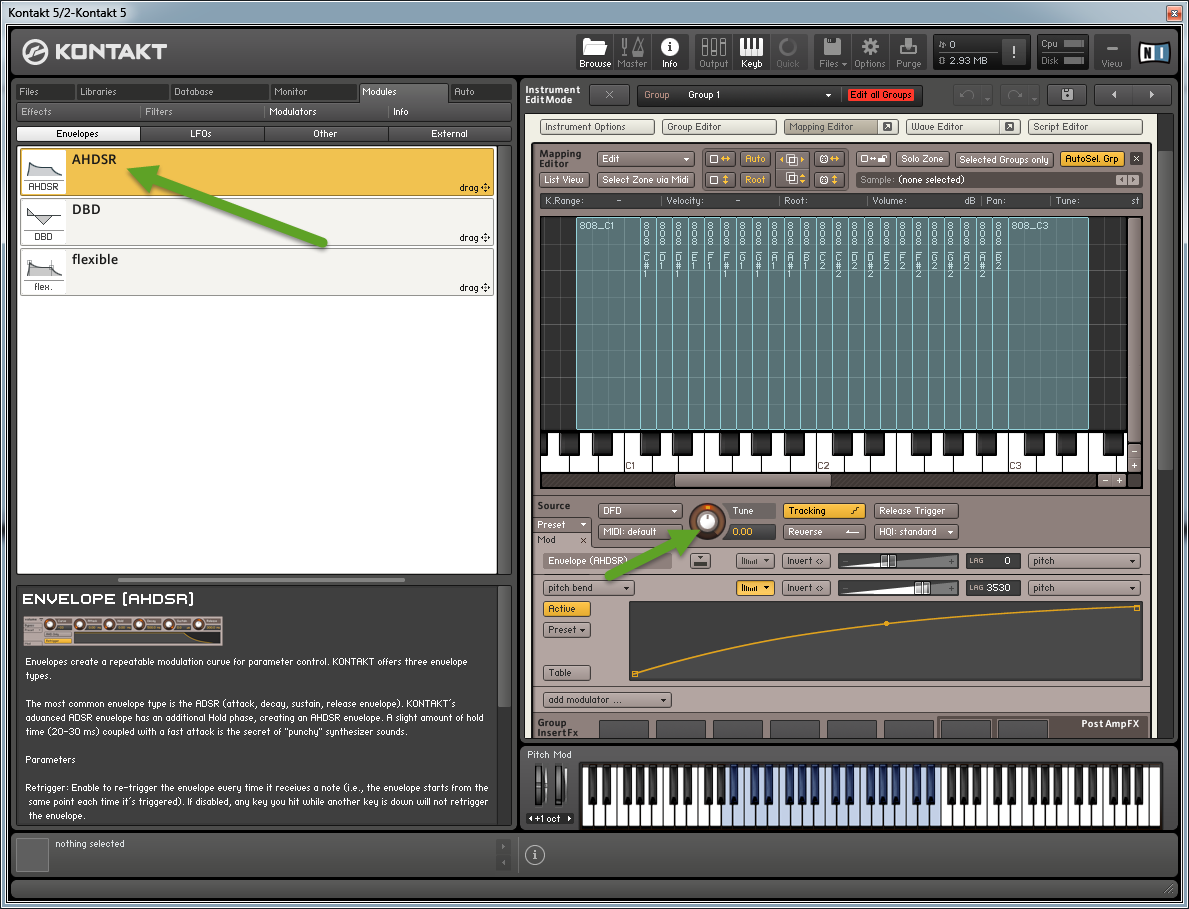
The new envelope shows up at the bottom.

Examples of Pitched 808s in Kontakt.
DBD (Decay, Break, Decay)
The DBD Envelope is exclusive to Kontakt 5 only, and can make a dull 808 hit harder and cut through the mix. It can make the kick sound as if was layered with another kick.
Drag and drop the DBD envelope to the Tune knob.
DBD Envelope

Adjust the DBD envelope similar to the example below. Decay #1 and #2 are turned down fairly low and the Break is turned up to increase the punch in the 808.
DBD Adjusted for punchier 808 kicks in Kontakt 5.

Listen to the examples below of the DBD Envelope and how it makes the 808 punchier.
Final Thoughts
In conclusion, you learned how to unleash the power of Kontakt 5 and create your own 808 instrument from samples. Stay tuned for more tutorials in the 808 secrets series from synthfinity.com.
Making an 808 Instrument using Kontakt 5 is easy but if you don’t have time to do so and
you are looking for an 808 instrument library for Kontakt 5. Check out Subfinity. It contains over 100 808 presets that will enhance your productions.
Synthfinity.com offers various 808 samples and 808 synth presets, download them here.
Download free Kontakt 5 808 tutorial content.
MIDI (right click and save target as)
Samples